Building a Realtime Chat with Otoroshi
Harnessing the capabilities of Websockets, Wasm, and Otoroshi.

Implementing a real-time chat feature poses significant challenges. It involves addressing concerns such as scalability, latency, and security while also ensuring a positive user experience through effective content moderation and customizable chat options.
This article doesn't serve as a tutorial on developing the optimal environment for a real-time chat, covering aspects like scalability and latency. Instead, its primary aim is to demonstrate within the WebSocket flow development how certain functionalities can be conveniently delegated to Otoroshi.
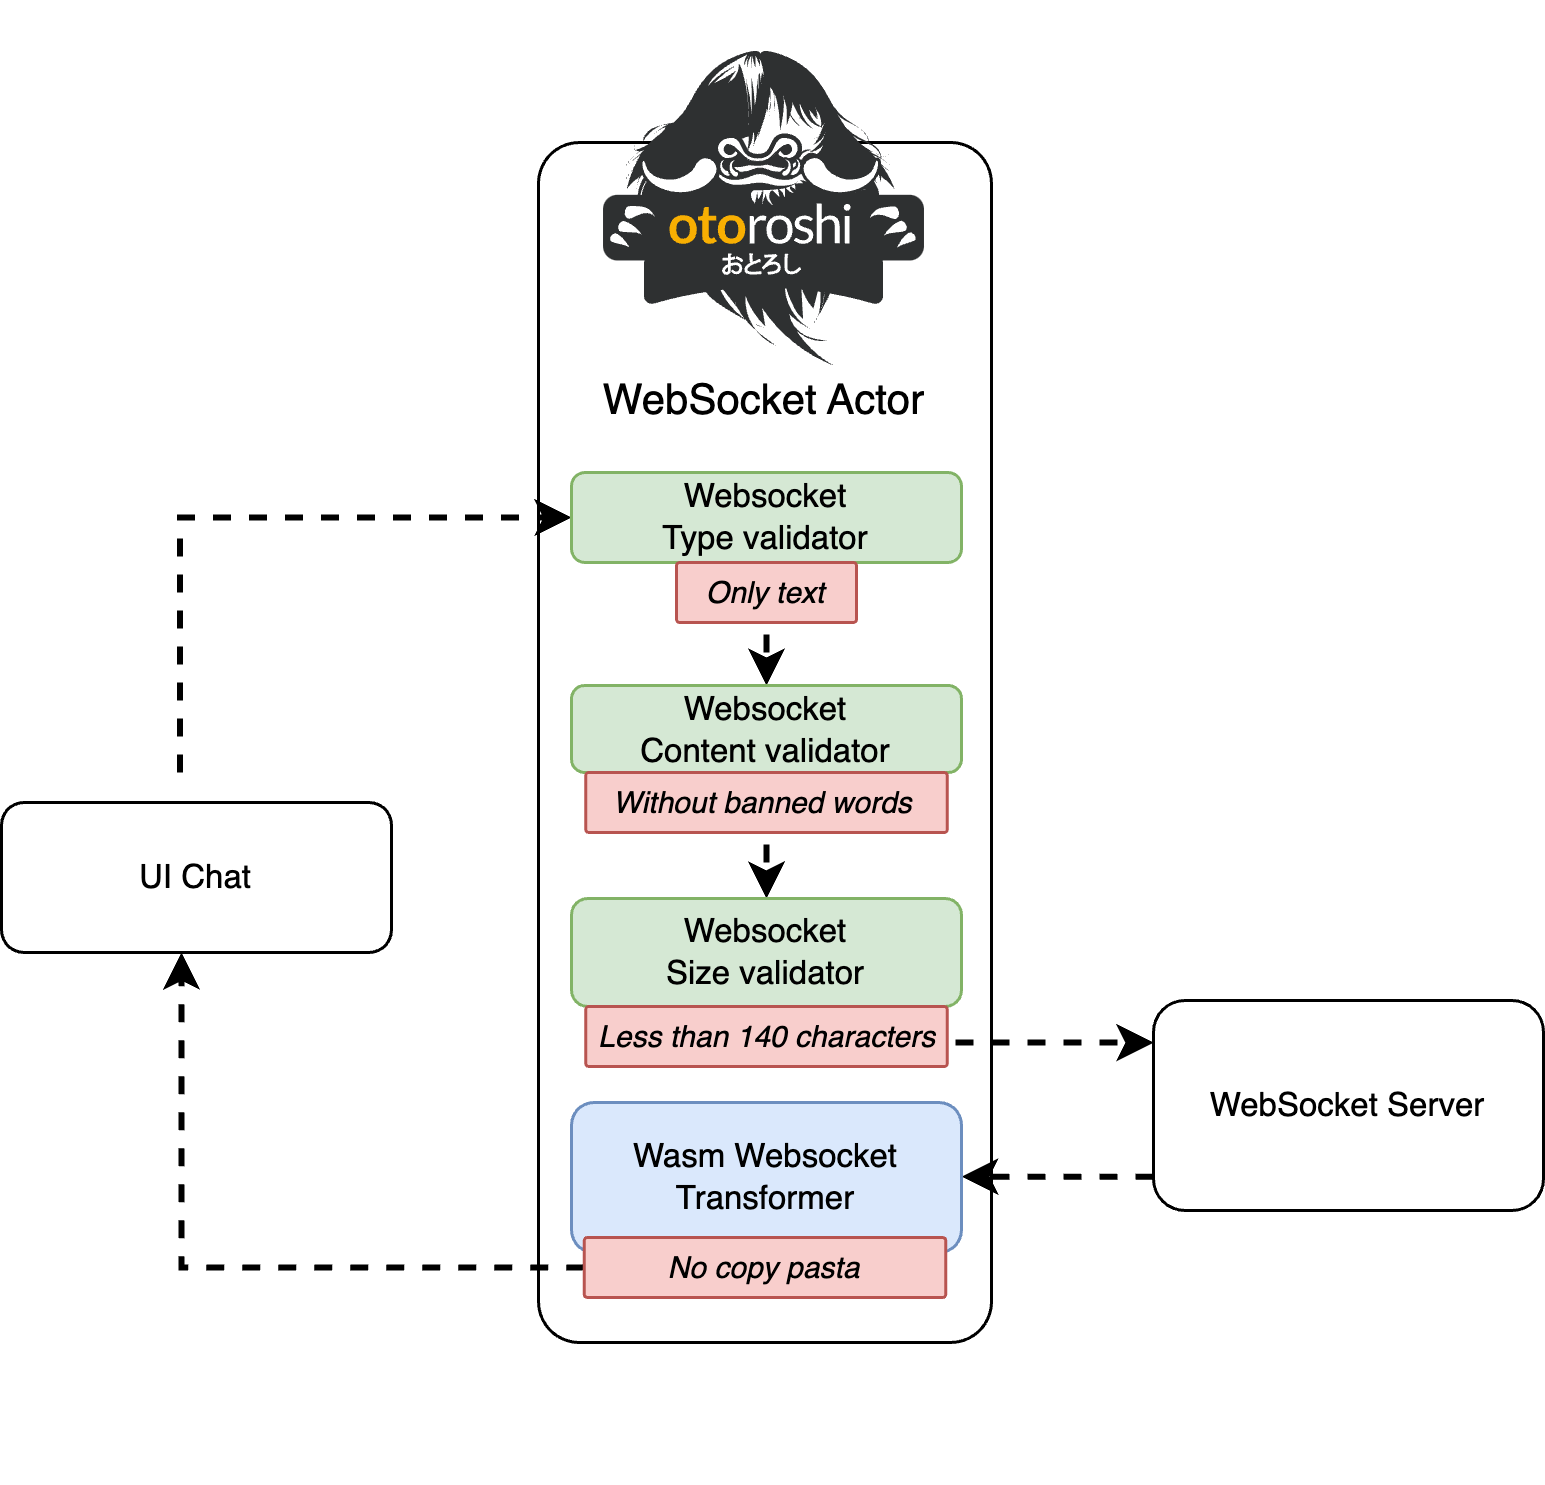
In this article, the objective is to cover a maximum of functionalities by writing minimum of lines of code, simply using the reverse proxy Otoroshi. Beginning with an unrestricted chat and progressing to a more moderate one, we will ensure the final result aligns precisely with the provided schema.
UI chat with React and Vite

This part is not the main objective of the tutorial. So let's create a simple UI chat using React and the frontend tool Vite to bundle and serve it.
yarn create vite chat --template react &&
cd chat &&
npm install &&
npm run dev
By this stage, you should encounter a display similar to Local: http://localhost:5173/. From here, you can explore and visualize the default template of Vite, including its layout and the interactive component.
Let's change the template with our unique Chat component.
Start by creating the raw HTML content.
WebSocket messages will contain the name of the user and a content. To match this case, we should add a messages array to store all chat messages and a message state to save the user input.
The final step to fully enable our component is to send and receive messages.
Let's configure the server part and come back to complete the implementation.
A simple Chat Server
To get a realtime chat in our browser, we have to establish a bidirectional communication between server and user with low-latency.
One good choice is to use WebSocket. It is a communication protocol that provides a way for web browsers and servers to establish a long-lived, bidirectional connection, enabling real-time data exchange without the overhead of traditional HTTP requests and responses. It is also very easy to install on both sides.
We will create the server using NodeJS and the ws package.
Our implementation follows few steps :
create a new WebSocket server listening on
4444portinitialize an empty array to store
clientsadd a callback on the
connectionevent, indicating that we have a connected client, save client to the array, and greet himadd two callbacks on
errorandcloseevents, to handle errors and the handle the case where a user leaves the chatforward received messages to other connected clients
The initial version of our server is complete. You can now return to the frontend to establish the connection with it.
The first communication
Let's modify our React component to interact with the WebSocket that has been set up.
The first action is to utilize the WebSocket API within JavaScript. It's relatively simple, requiring only a few lines to establish communication.
The socket is opened on port 4444, and it tracks the connection state by storing the status in a React state. This variable will be utilized to control access to the chat input.
The next step is to configure the listener plug on message events to save incoming messages to our React state. The final line saves the instance of our WebSocket.
Let's use this instance to send messages, written from our input.
We added an new state to store message written by our user. The send button is disabled if the WebSocket instance is not created, thus preventing a null exception. The onClick callback sends the message to the socket.
👏 Well done. Our simple chat using WebSocket is working.
Spicing Up Conversations: Creative Chat Enhancements
Our chat is functional, but it lacks many exciting features typically found in chat platforms. Let's explore leveraging the reverse proxy Otoroshi and Wasm to enhance its capabilities.
Content Moderation
The first thing presents in all chat is the moderation. Let's apply the same rule as a Twitch Chat : messages containing chosen and predefined banned words (words that discriminate on ethnicity or race, threats of violence, etc ...) will be drop. For our chat, we will just banned random words to validate the behaviour.
Let's delegate to Otoroshi.
We need to download and start the latest version of Otoroshi (currently v16.15.1), with predefined administration password.
curl -L -o otoroshi.jar 'https://github.com/MAIF/otoroshi/releases/download/v16.15.1/otoroshi.jar' &&
java -Dotoroshi.adminPassword=password -jar otoroshi.jar
Then to create a new route to forward requests from chat.oto.tools/server domain to our WebSocket server localhost:4444. We've supplemented the plugin list with a Websocket content validator in and configured it to filter out messages containing any of our specified banned words, ensuring they are dropped accordingly.
The simple way to create a route is to use the Admin API for managing Otoroshi instances.
curl -X POST "http://otoroshi-api.oto.tools:8080/apis/proxy.otoroshi.io/v1/routes" \
-u admin-api-apikey-id:admin-api-apikey-secret \
-H 'Content-Type: application/json; charset=utf-8' \
-d @- <<'EOF'
{
  "name": "Websocket room",
  "frontend": {
    "domains": ["chat.oto.tools/server"]
  },
  "backend": {
    "targets": [
      {
        "hostname": "localhost",
        "port": 4444
      }
    ]
  },
  "plugins": [{
      "enabled": true,
      "plugin": "cp:otoroshi.next.plugins.WebsocketContentValidatorIn",
      "config": {
        "validator": {
          "kind": "json-path-validator",
          "path": "$.message",
          "value": "NotContainedIn(foo,bar)",
          "error": null
        },
        "reject_strategy": "drop"
      }
   }]
}
EOF
Once done, we can navigate to http://chat.oto.tools/server and try to send few messages containing or foo/bar content.
Ensure that only text messages are accepted
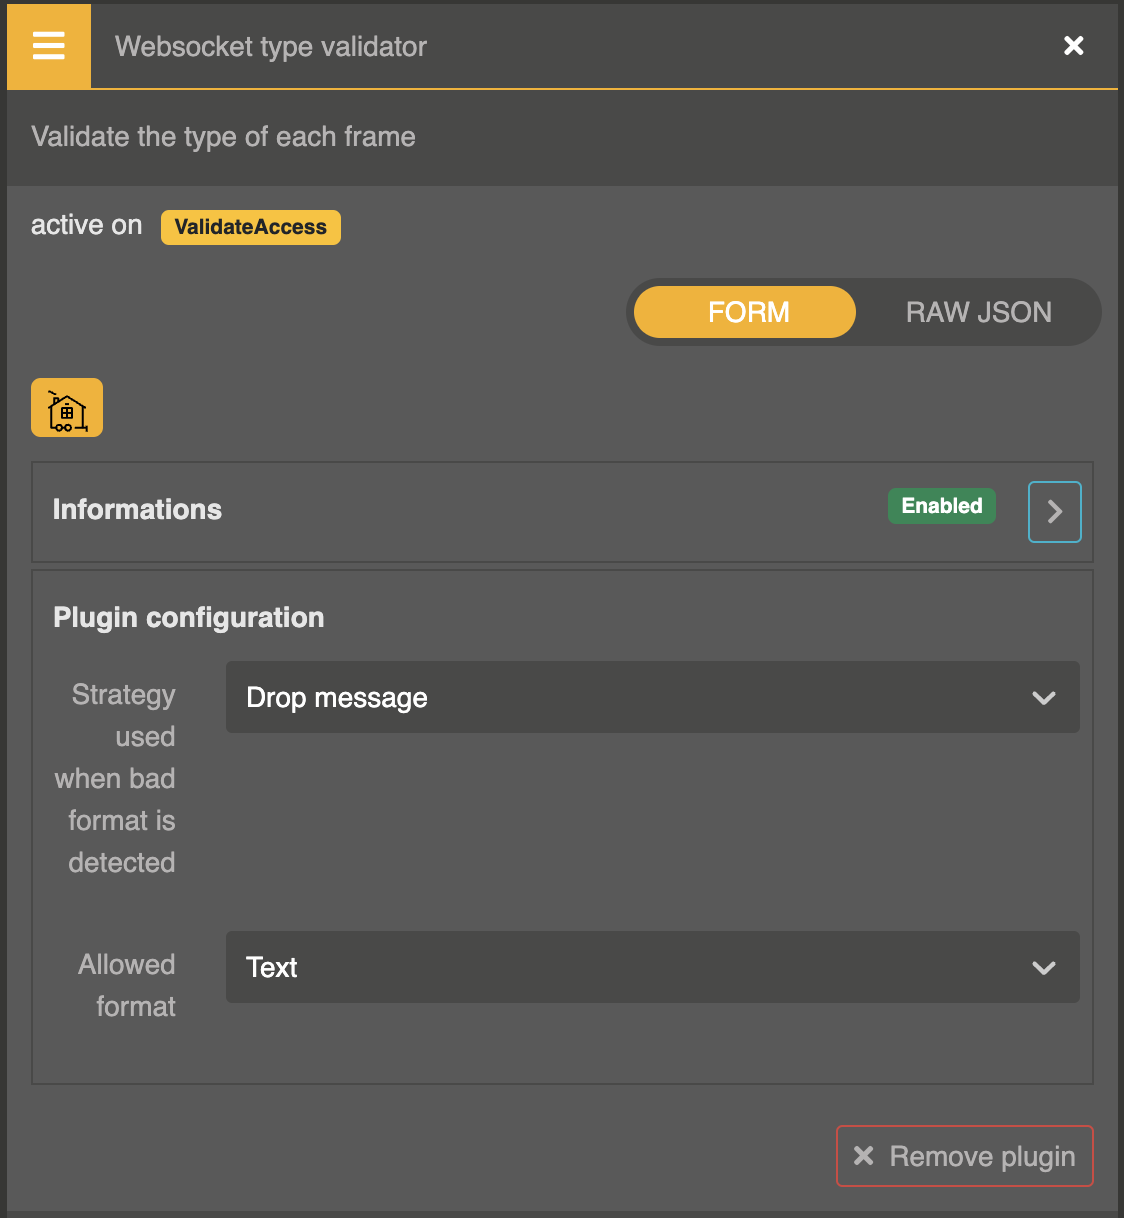
For the moment any kind of messages can be send through our WebSocket. It can be text, JSON or binary. For our use case, we want to only accept text messages. As the same previous way, we can add a other plugin of Otoroshi called Websocket type validator and select Text as Allowed format.
This task can be accomplished through the Otoroshi UI.
Navigate to the dashboard, then log in using
admin@otoroshi.ioandpassword(unless you've changed them previously).Access the Routes section by clicking the corresponding button on the sidebar and select the route that was previously created.
Next, click on the Design button located on the left sidebar.
In the plugin list, search for the WebSocket Type validator and add it to the flow.
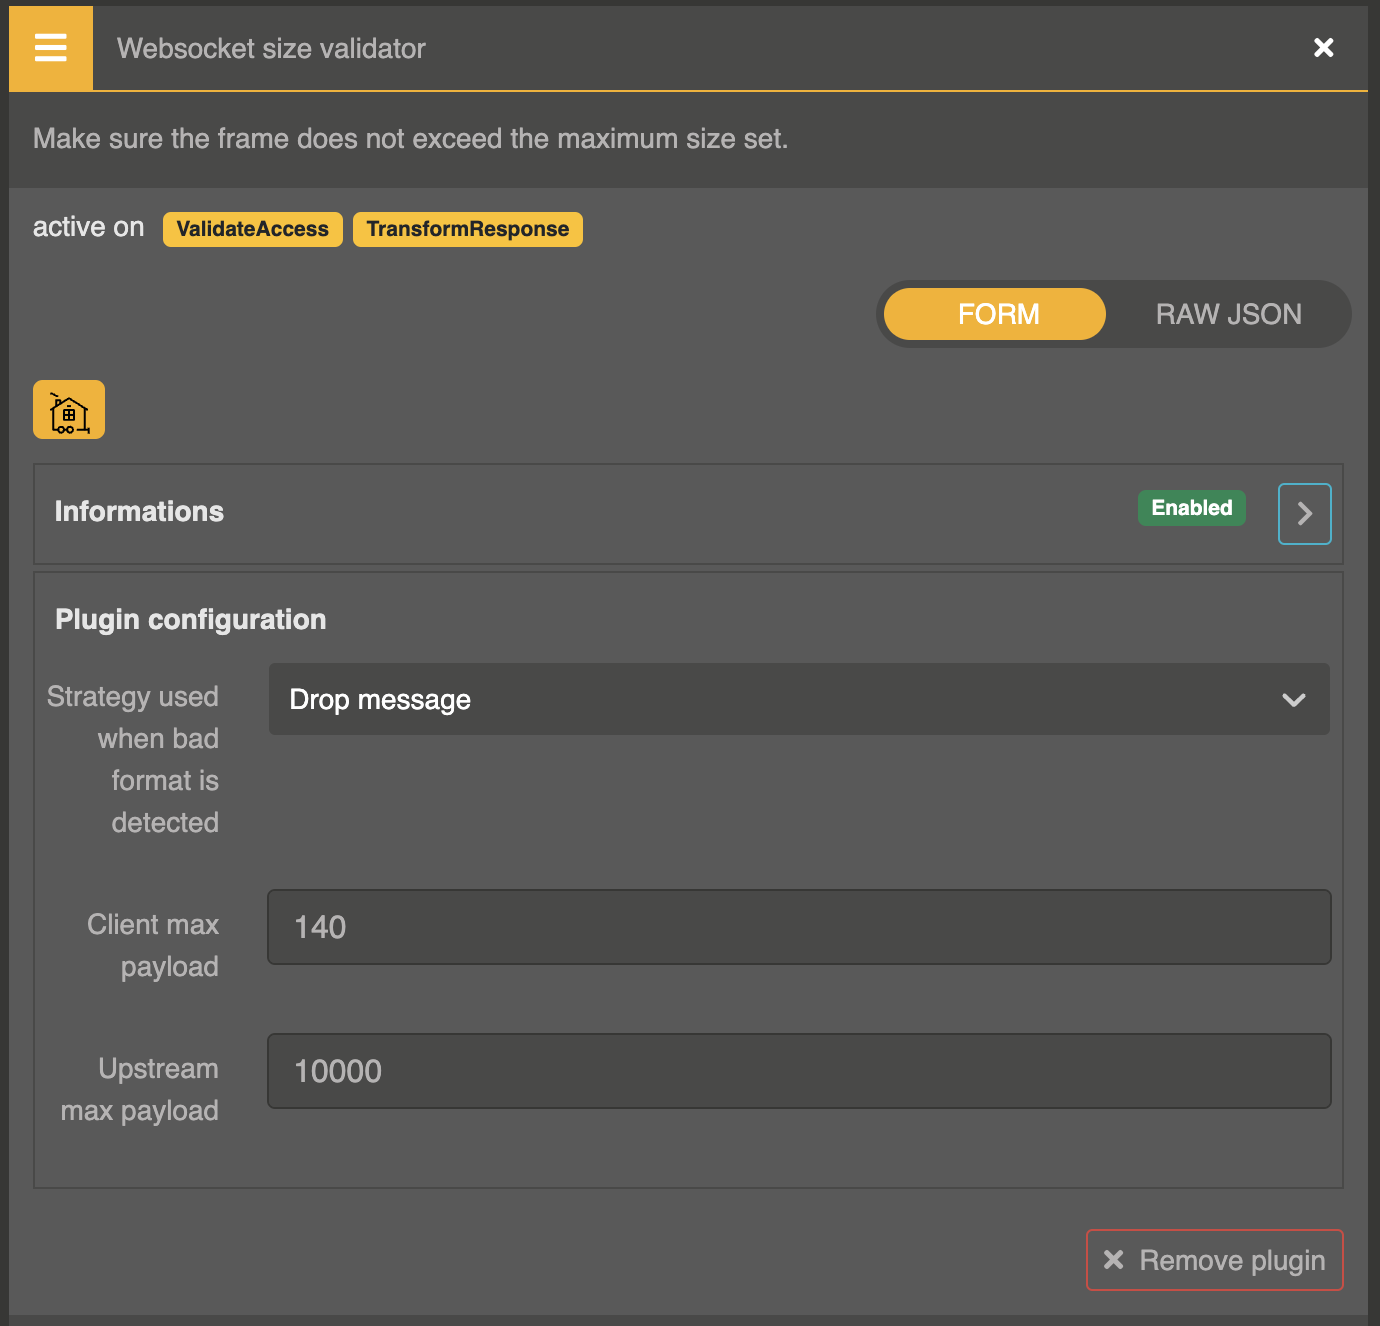
No more than 140 characters
In many cases, chat messages need to be limited in length. Otoroshi offers a suitable plugin for this scenario, allowing precise control over each WebSocket frame, ensuring that message lengths remain within specified bounds.
The size unit fits the selected message type. If you choose binary, the boundary will be calculate in bytes, whereas for string messages, length will be utilized.
Let's add the Websocket size validator plugin in a similar manner as before on the route and set up both upstream and downstream boundaries to regulate message sizes effectively.
Prevent "copy pasta"
A copypasta is a block of text copied and pasted to the Internet. It containing controversial ideas or lengthy rants are often posted for humorous purposes, to provoke reactions from those unaware that the posted text is a meme.
This kind of moderation is a great challenge to implement because it needs to memorize messages in time. We will leverage Wasm and Otoroshi to add this functionnality.
Let's start by writing the code using Javascript.
Starting by declare new state to save messages and three thresholds maxOccurrences, copyPastaDetection and copyPastaPrisonTime. Suppose we implement a mechanism to capture messages if they occur three times within the copyPastaDetection interval, measured in milliseconds. Subsequently, we'll discard these messages for the copyPastaPrisonTime duration, also in milliseconds, before allowing users to write them again.
let messages = {};
let maxOccurrences = 3;

let copyPastaIntervalDetectionTime = 5000; // ms
let copyPastaPrisonTime = 10000; // ms
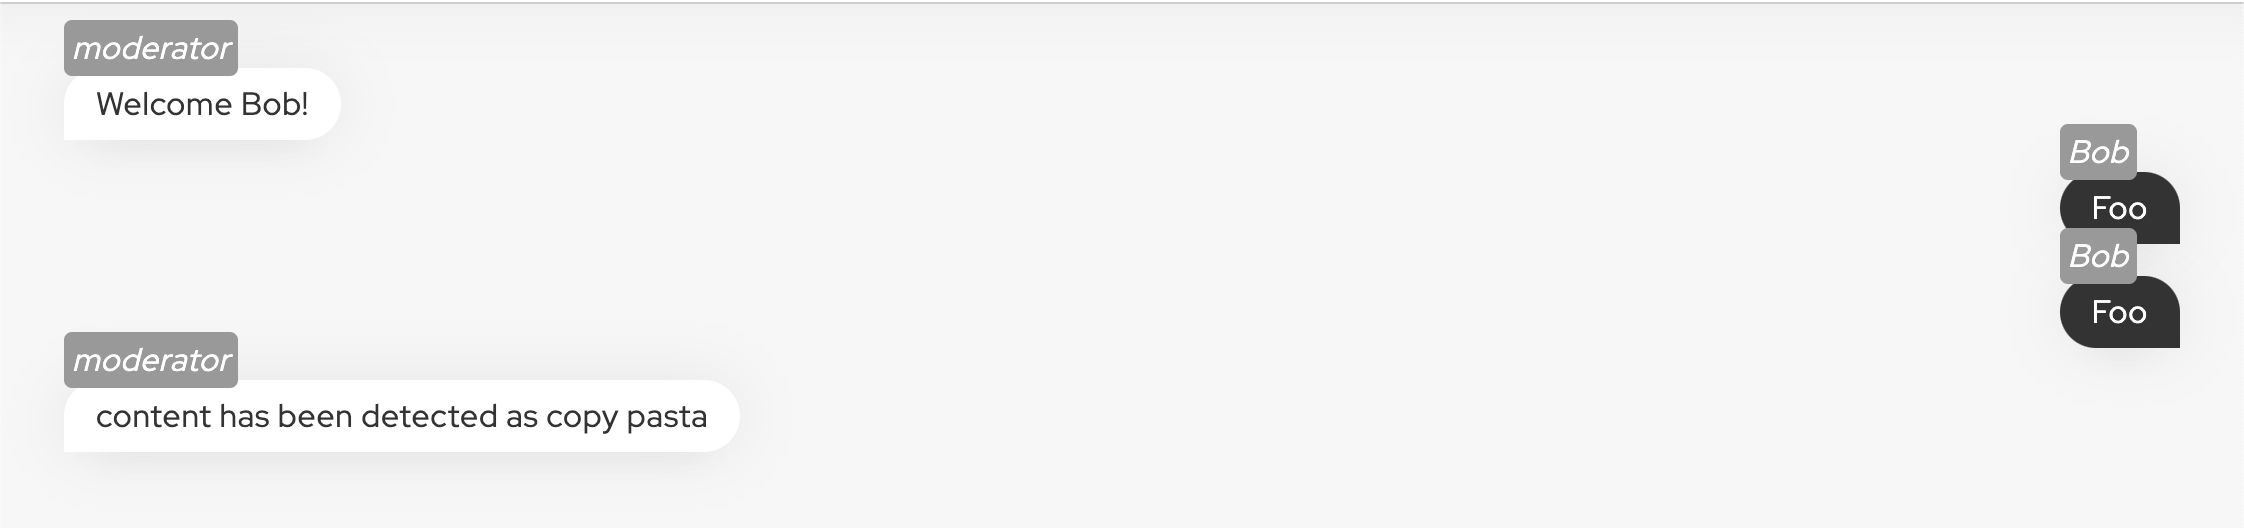
Then we need to update our callback set up on the message event to check if message is a copy pasta or not. If yes, we will just send a message from as moderator to indicate to the user that message has been detected and drop.
if (isCopyPasta(message)) {
      clients
        .forEach(client => client.ws.send(JSON.stringify({
          name: "moderator",
          content: "content has been detected as copy pasta"
        })))
    } else {
      clients
        .forEach(client => client.ws.send(JSON.stringify({
          name,
          content: data.toString()
        })));
    }
Let's write our isCopyPasta method.
Let's break down the code :
Trimming the Incoming Message:
Initially, we trim the incoming message to remove any leading or trailing whitespace. Although there might be more sophisticated methods, we keep it simple for our case.
Saving the Message:
Next, we save the message into our
messagesobject. We increase its occurrence count and update the timestamp to indicate the last time it was seen, in case it's a known message.If the message hasn't been seen within the elapsed
copyPastaIntervalDetectionTimeduration, we reset the last time variable.Removing Old Messages:
Finally, we remove messages from the
messagesobject that either haven't been seen more thanmaxOccurencestimes within thecopyPastaIntervalDetectionTimeinterval or have exceeded their time in prison.Let's restart the server and test the functionality in real-time.
Leverage Wasm and Otoroshi to manage “copy pasta”
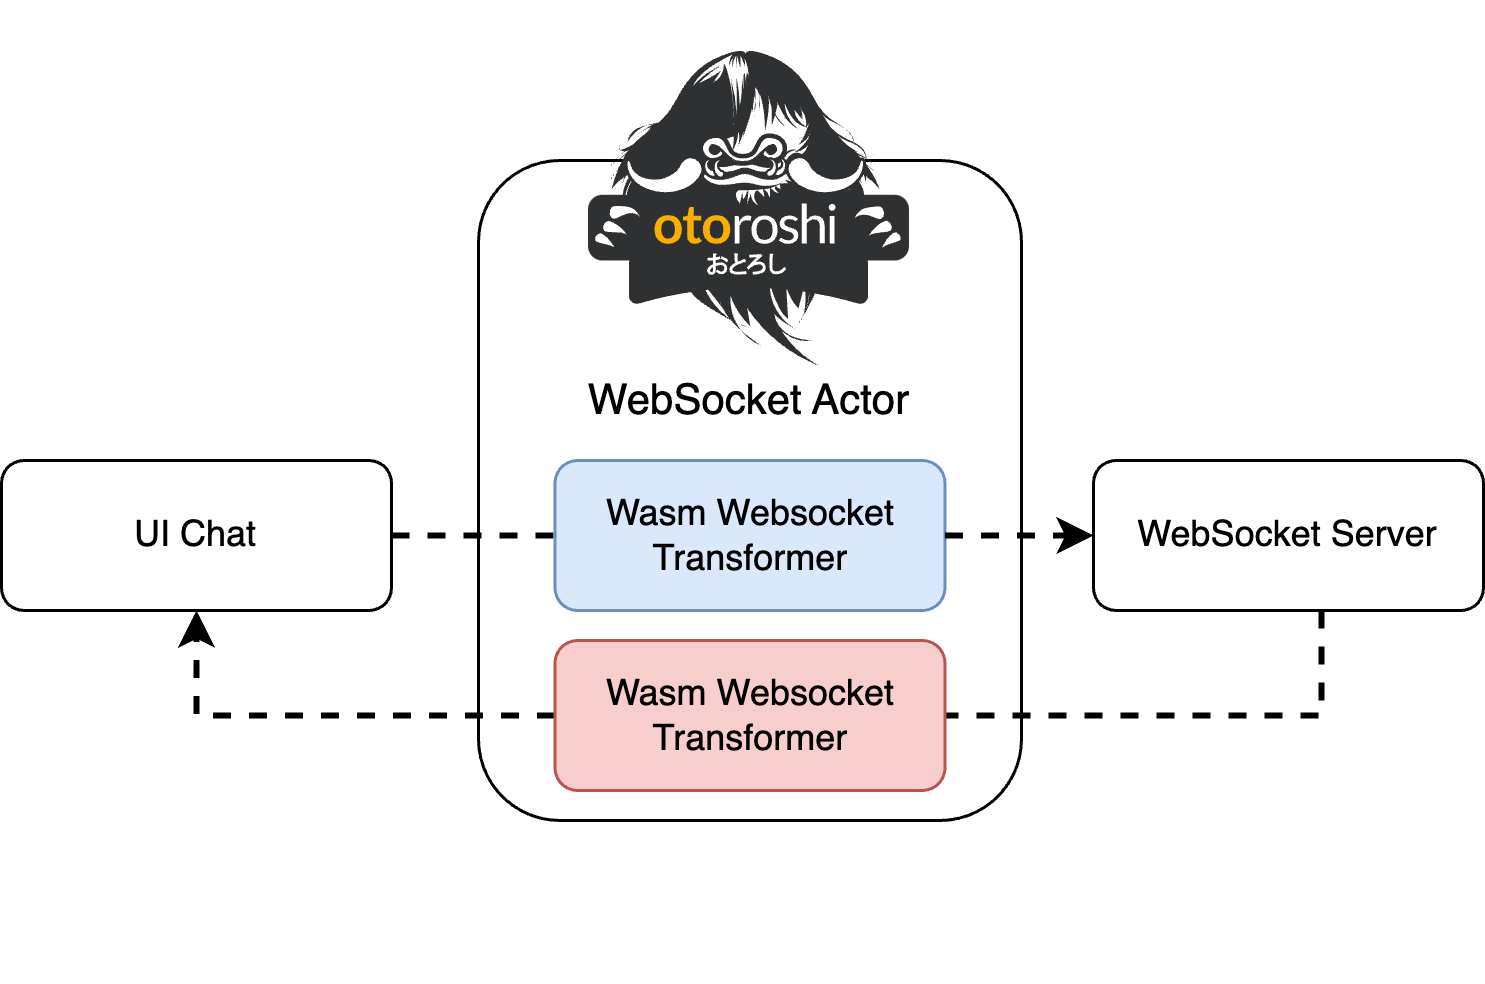
The objective is to moderate the content of our chat using Otoroshi. So we can explore the Wasm Websocket plugin of Otoroshi to migrate our JS code inside Wasm executing in Otoroshi.
The code is quite similar to that in the previous section. We just declare
on_request_messageandon_response_messagefunctions to handle downstream and upstream WebSocket frame. Theses methods will be call for each WebSocket frame that passed to our route, and will execute an Wasm file containing our previous Javascript code.We also use the
Host.inputStringandHost.outputStringto read the WebSocket frame, coming from Otoroshi, and to return our response to the client. Both methods are writing contents in the linear memory in order to communicate between the Wasm execution binary and the host Otoroshi
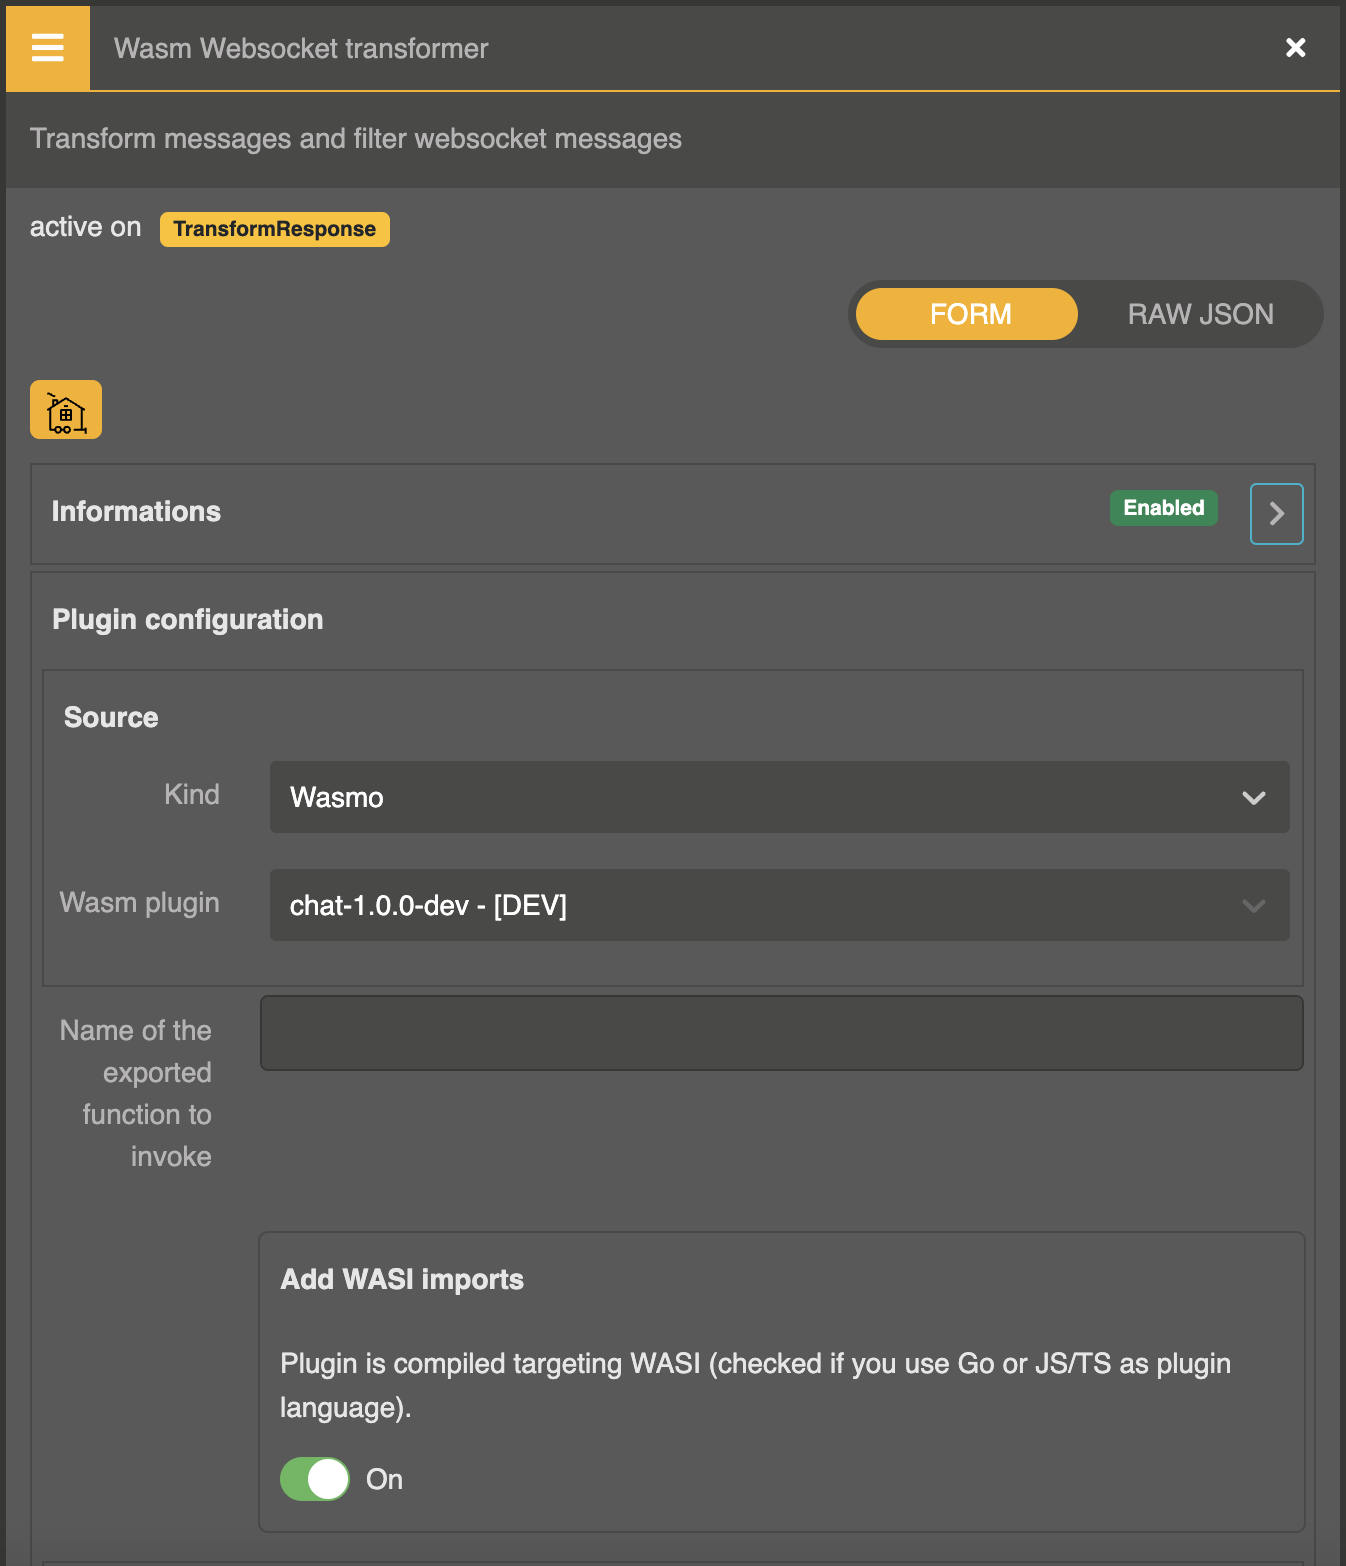
To build this wasm, you can use Wasmo, which provides CLI and application to quickly build Wasm binaries.
Once build, we can simply add the last plugin of this article to our route, called Wasm Websocket transformer, by selecting Wasmo source.
Restrict the Chat to authenticated users
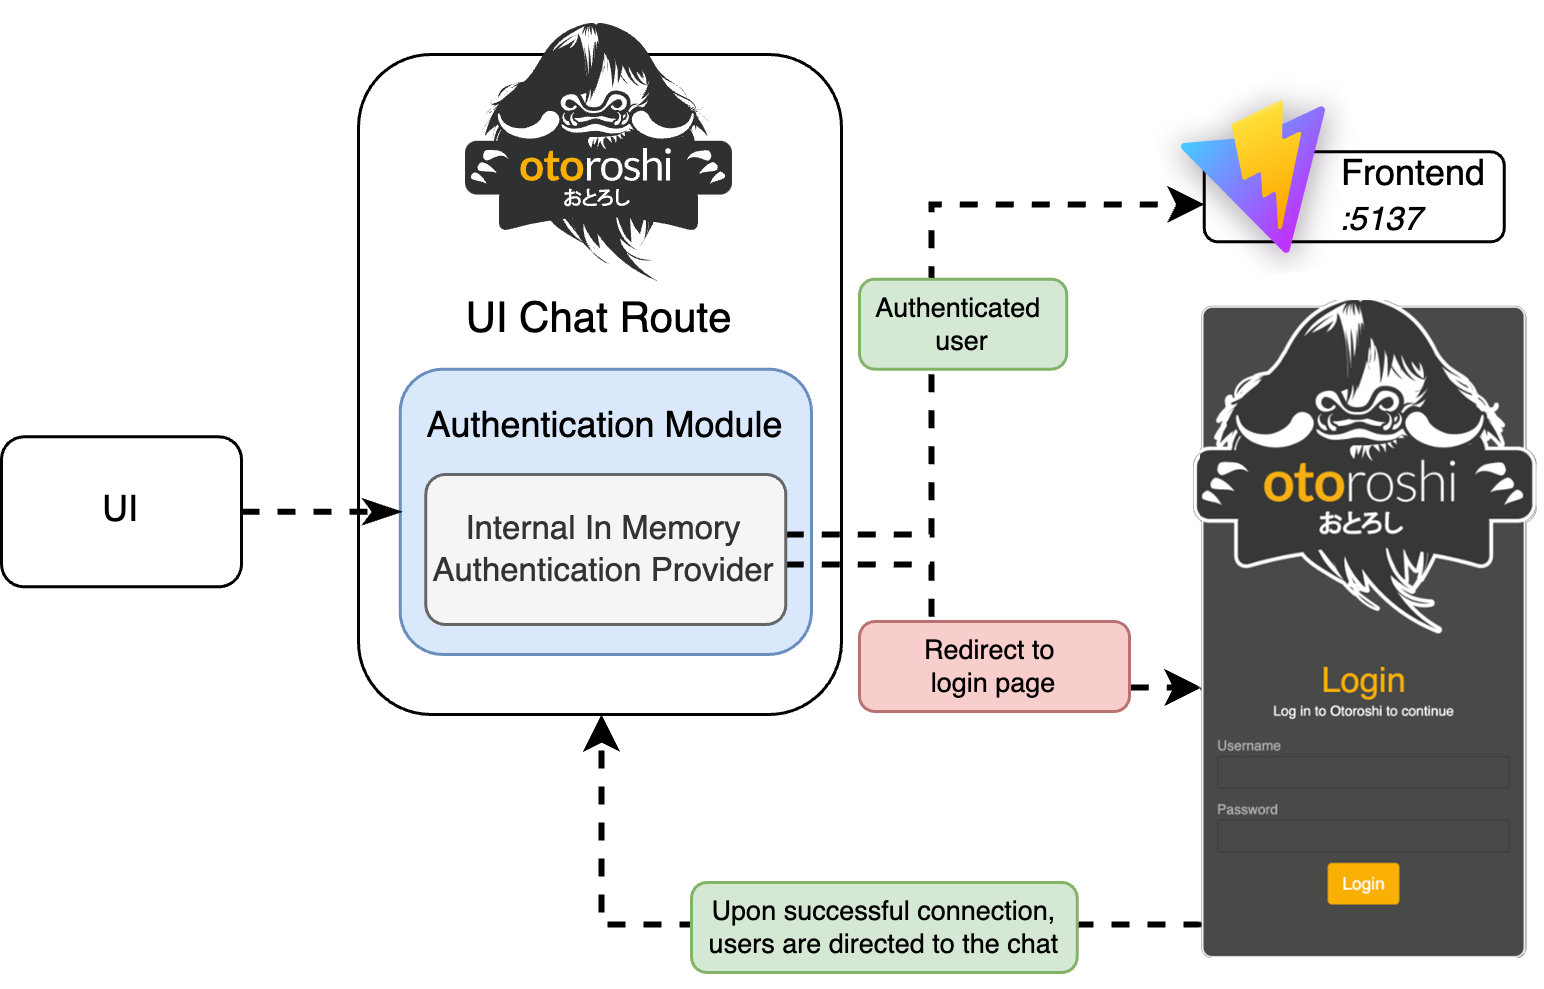
Chat is not rarely guest accessible and of course Otoroshi serves as an effective tool for securing communications. We aim to prevent unauthorized access to our WebSocket server and restrict usage of the chat UI to authenticated users only.
To match the schema, we need to
add an Authentication module to our route, and to select the In Memory Auth. provider, which is the authentication provides by Otoroshi, running without external Identity provider.
add an Apikey validator plugin on the
chat.oto.tools/serverroute to prevent users to call it without security.end by adding an User extraction from auth. module to the
chat.oto.toolsroute to convert the authenticated user to an apikey. It is a common process in Otoroshi and allows route to be called with apikey and Authentication modules.
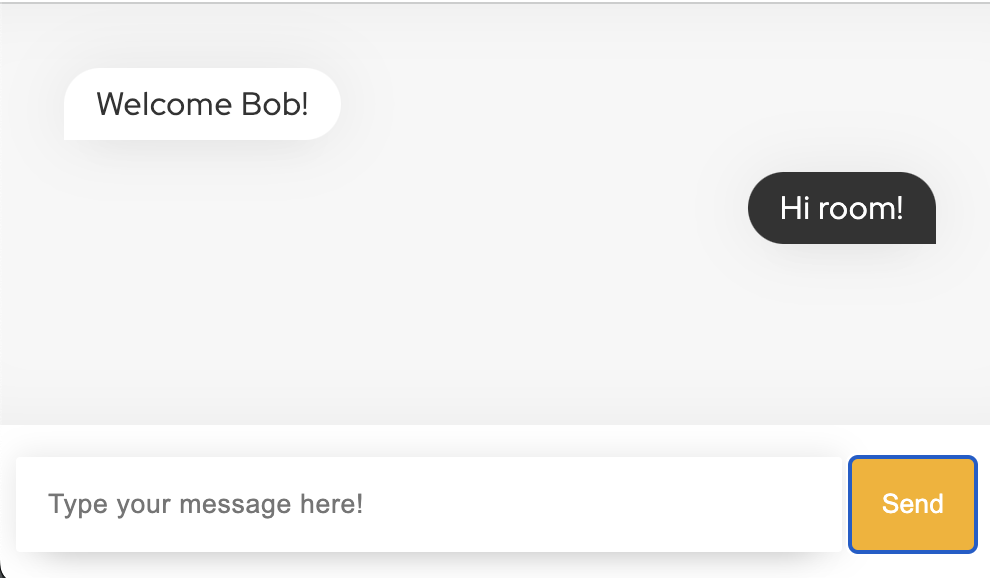
We can now navigate to the chat and use wasm@oto.tools and password as credentials. If everything is functioning correctly, we should be greeted with a "Welcome Bob!" message. 🎉
Final Chat Configuration
We've concluded the initial part of the series. Our objective has been achieved, featuring a straightforward Chat secured by Otoroshi, boasting enjoyable features.

What's in store for the next installment of this series?
In the upcoming article, we'll delve into enhancing the message validator using AI and crafting a small bot to provide contextual responses.

